Tutorial
Loading the Tutorial Scene
First, create a new project for the tutorial to load the tutorial scene. Kinesis comes with a simple scene for the purposes of this tutorial under the path Kinesis/Demo/Scenes/TutorialScene.unity, which you can open by either navigating to it via File > Open Scene or the Project window.
Setting Up Muscle Visualization
Kinesis comes with a Muscle Render Gizmo component that adds muscle visualization elements to the Scene view.
- Create a new empty
GameObjectand rename it to “MuscleRenderGizmo” (the name isn’t critical). - Add a Muscle Render Gizmo component to the new object.
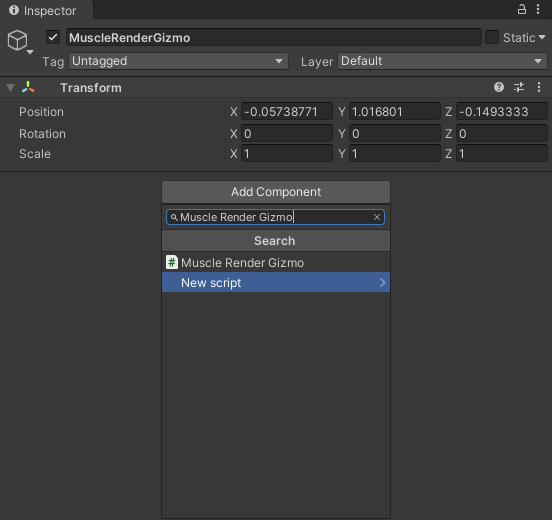
- Select the “MuscleRenderGizmo” object to focus it in the Inspector window.
- Attach the Muscle Render Gizmo component. Select the Add Component button in the Inspector window, then type “Muscle Render Gizmo” into the search field when it appears. The Muscle Render Gizmo component should appear as the top search result. Select the component in the search result to add it to the object. We’ll leave the default settings for the tutorial.
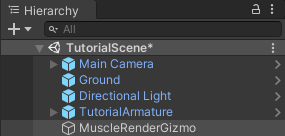
- Your project hierarchy should now look something like this:
Setting Up a Basic Muscle
For the tutorial, we’re using a slightly modified character model from Unity’s Starter Assets - Third Person Character Controller, but the following steps should work for pretty much any other model with a typical humanoid skeleton.
Unpacking the Prefab
In order to freely edit the tutorial model, first we’ll need to unpack the prefab to unlink it.
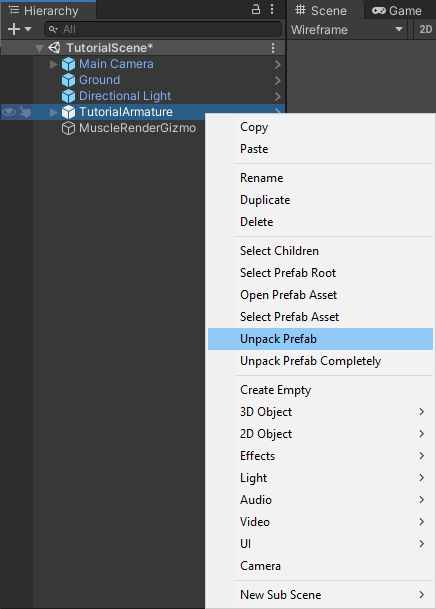
- Find the “TutorialArmature” object in the Hierarchy window and secondary click on it to open up a context menu.
- Select the Unpack Prefab option.
Creating a Jointed Limb
Before you can create a functioning muscle, you’ll first need at least two Rigidbody objects connected by a Joint. We’ll set up the left arm’s upper and lower sections with Rigidbody components and connect them via a CharacterJoint component that represents the elbow.
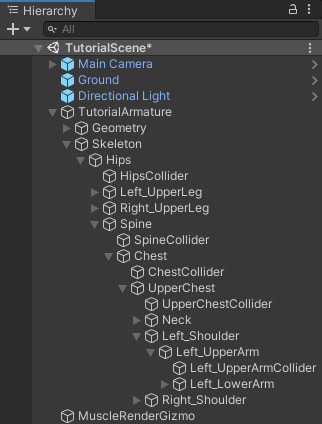
- In the Hierarchy window, expand out the object hierarchy under “Skeleton” until both the “Left_UpperArm” and “Left_LowerArm” objects are exposed. The path should be “TutorialArmature” > “Skeleton” > “Hips” > “Spine” > “Chest” > “UpperChest” > “Left_Shoulder” > “Left_UpperArm” > “Left_LowerArm”.
- Add a Rigidbody component to the “Left_UpperArm” object.
- Select the “Left_UpperArm” object to focus it in the Inspector window.
- Select the Add Component button in the Inspector window, then type “Rigidbody” into the search field when it appears. The Rigidbody component should appear as the top search result. Select the component in the search result to add it to the “Left_UpperArm” object.
- Configure the Rigidbody component on the “Left_UpperArm” object:
- Set Is Kinematic to
true. The reason for this is that the rigidbody’s movement is not currently limited by a connected joint or any other constraint, so it’ll move independently of the rest of the model if we don’t constrain it. For this tutorial, we are only testing the muscle’s effect on the lower arm and we’ll want to “pin” the upper arm in space.
- Add both a Rigidbody and Character Joint component to the “Left_LowerArm” object.
- Configure the Rigidbody component on the “Left_LowerArm” object:
- Set both Drag and Angular Drag to 10. We really should be adjusting the inertia tensor, but that’s outside the scope of this tutorial.
- Configure the Character Joint component on the “Left_LowerArm” object:
- Set the Connected Body field to reference the “Left_UpperArm” object.
- With the “Left_LowerArm” object in focus in the Inspector window, navigate to the Connected Body field. You can either drag the “Left_UpperArm” object from the Hierarchy window and drop it onto the Connected Body field, or you can select the circular bullseye icon to open the Object Picker and search for the “Left_UpperArm” object (if so, make sure to have the Scene tab selected to display the results we want).
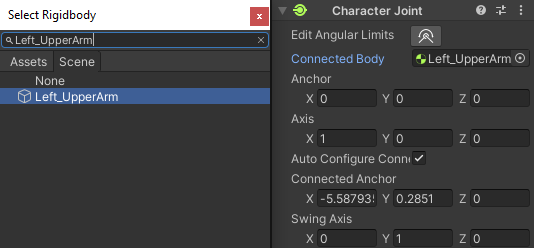
- With the “Left_LowerArm” object in focus in the Inspector window, navigate to the Connected Body field. You can either drag the “Left_UpperArm” object from the Hierarchy window and drop it onto the Connected Body field, or you can select the circular bullseye icon to open the Object Picker and search for the “Left_UpperArm” object (if so, make sure to have the Scene tab selected to display the results we want).
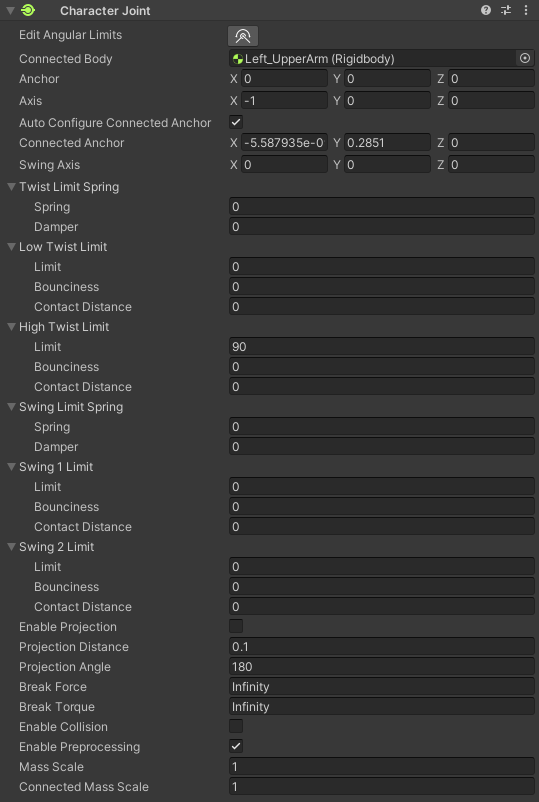
- Configure the Character Joint constraints. We won’t get too involved with configuring motion constraints, but for this tutorial, we’ll at least want to:
- Set Axis to X: -1, Y: 0, Z: 0.
- Set Swing Axis to X: 0, Y: 0, Z: 0.
- Set Limit under Low Twist Limit to 0 and under High Twist Limit to 90.
- Set Limit under both Swing Limit 1 and Swing Limit 2 to 0.
Note: If you’re not using the tutorial model, please be aware the exact axes and constraint angles you want may be different.
Creating a Muscle
- Create a new empty
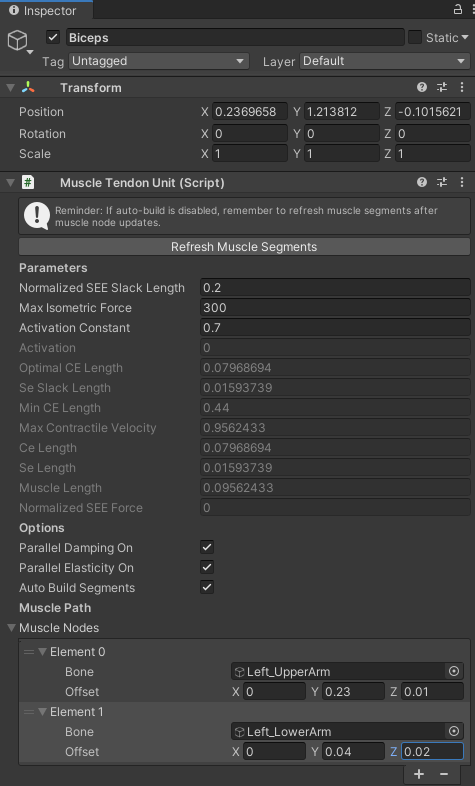
GameObject, rename it to “Biceps”, and attach the Muscle Tendon Unit component to it. You can either use the Add Component picker and search for “Muscle Tendon Unit,” or you can drag the script atKinesis/Scripts/Core/MuscleTendonUnitfrom the Project window and drop it over the Inspector window. - Once the Muscle Tendon Unit component as been added to your object, you’ll need to define some muscle nodes to define the muscle path. In the Inspector Window, go to the Muscle Nodes field and select the plus icon to add a new muscle node item to the list.
Note: Muscle nodes are expected to be defined in order from origin to insertion.
- Configure the first muscle node:
- Set the Bone field of the first muscle node to reference the “Left_UpperArm” object. In Scene view, the Muscle Render Gizmo should now be displaying a spherical indicator highlighting the muscle node’s position (this should initially be at the local origin at the shoulder socket).
- Set Offset to X: 0, Y: 0.23, Z: 0.01.
- Add a second muscle node.
- Configure the second muscle node:
- Set the Bone field of the second muscle node to reference the “Left_LowerArm” object.
- Set Offset to X:0, Y: 0.04, Z: 0.02.
- Your Inspector window should now look something like this:
Testing Muscle Movement
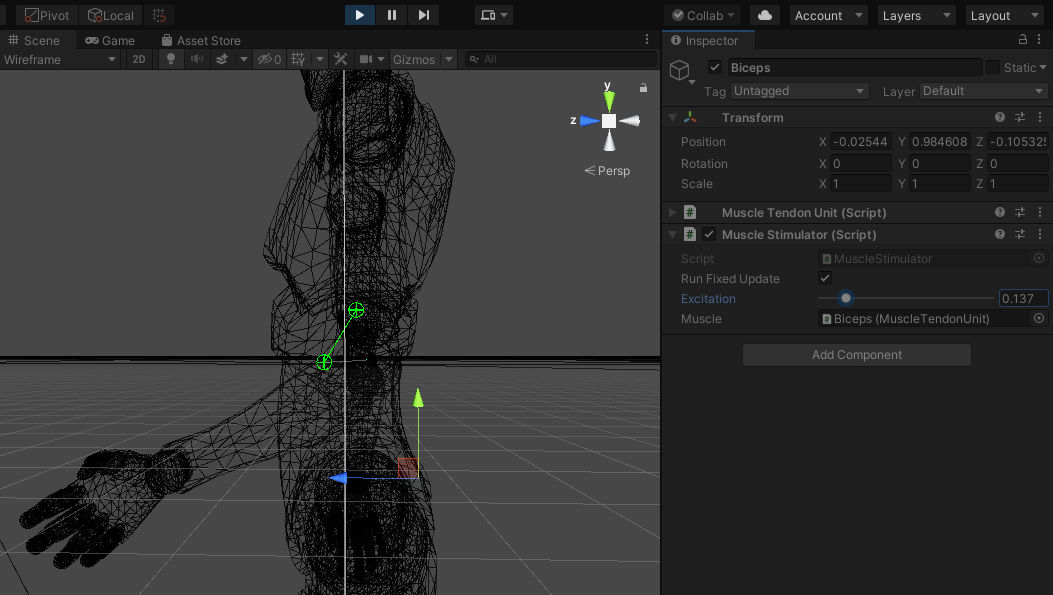
Once you’ve defined your muscle path, it’s time to test its movement. Kinesis comes with a Muscle Stimulator component for convenience. It allows you to directly run physics simulation and set excitation for individual muscles from the Editor.
- Add a Muscle Stimulator component to the “Biceps” muscle object.
Tip: It might help at this point to collapse the Muscle Tendon Unit component in the Inspector window by selecting the triangular icon next to the name in the header bar. This will help declutter your view.
- Configure the Muscle Stimulator component:
- Set Run Fixed Update to
true.
- Enter Play Mode and bring the left arm into view in the Scene view.
- With the “Biceps” muscle object in focus in the Inspector window, navigate to the Muscle Stimulator component and change the value of the Excitation field by adjusting the slider. You should see the lower arm react to the changes in excitation.
That’s the end of the tutorial. Feel free to continue to experiment with the tutorial environment or move on to the Demo Scene.