Demo Scene
Demo Overview
Kinesis comes with a simple demonstration scene that includes a model rigged with several muscles. Please refer to the Package Contents section for the demo directory layout.
Caveat: The model in the demo is not meant to be taken as anatomically precise or accurate. The model is only generally humanoid, the skeleton is fairly simple, and the muscle paths are “looks good enough” estimates adapted to the morphology of the model.
The parameters of the muscles themselves are also currently not set against any particular reference, so their responses may not be quite true to life. Also, not all of the muscles were able to receive equal amounts of testing attention, so there are certain to be configurations that don’t behave well. Feel free to experiment away, just be aware that the model is merely a rough demo.
The included “DemoArmature” has two important children in its hierarchy:
-
“Skeleton”: Contains the skeleton hierarchy. It has been configured with colliders, Rigidbody components, and CharacterJoint components for the demo.
Caveat: Since there is no automated muscle controller out-of-the-box, unless you have a controller of our own, you’ll have to constrain parts of the model if you want it to “stand upright.” I typically set Is Kinematic to
trueon the Rigidbody components of the “Hips,” “Spine,” “Chest,” and “Upper Chest” in order to “pin” them in place when working with limbs in isolation. -
“Musculature”: Contains the muscle hierarchy. You’ll find all of the muscles here, organized under muscle groups.
Demo Components
Camera Controller: Provides a simple free-roam camera controller for navigating the Game view in Play Mode.Muscle Simulation: Provides a centralized loop that runs physics calculations for all of the muscles in the scene and feeds in any excitations from the Muscle Stimulator components connected to the muscles.
Loading the Demo Scene
You’ll find the Demo Scene under Kinesis/Demo/Scenes/DemoScene.unity, which you can open by either navigating to it via File > Open Scene or the Project window.
You can either create a new project or use an existing one to open the scene.
Viewing the Demo Scene
The demo scene has a Muscle Render Gizmo component set up to visualize muscle-related data in Scene view, but you can also use the provided free-roam camera (“Main Camera”) to navigate around the Game view when Play Mode is active.
To switch between whether Play Mode starts in Game view or Scene view, select “Main Camera” in the Hierarchy window and toggle Start in Scene View under the Camera Controller component.
Interacting with the Demo
The demo has a Muscle Simulation component attached to each muscle that allows you to adjust muscle excitation manually. Here’s a quick step through:
- Select “Main Camera” in the Hierarchy window and navigate to the Camera Controller component in the Inspector window. Make sure Start in Scene View is checked.

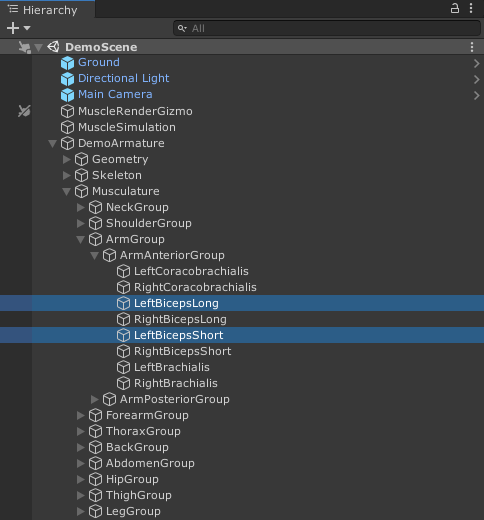
- In the Hierarchy window, expand “DemoArmature” > “Musculature” > “ArmGroup” > “ArmAnteriorGroup.” You should see the list of arm flexor muscles including the biceps. Hold Ctrl and select both the “LeftBicepsLong” and “LeftBicepsShort” muscles. You should see both muscles highlighted in the Scene view.
- Start Play Mode by selecting the Play icon or Ctrl + P.
- In the Inspector window, navigate to the Muscle Stimulator component and adjust the Excitation slider. Watch the muscles react in Scene view.
- Play around with other muscles. You can also see what happens if you adjust parameters such as Normalized SEE Slack Length and Max Isometric Force, though you’ll want to stop Play Mode before changing parameter values.